Panhard Parts
Panhard Oil Light Piston
Saturday 02 February 2013
I have been asked to make an oil light piston for a friend in Belgium, and as promised here it is. This is only used when you modify the crankcase oil circuits, and although it is of similar dimensions to the OEM part, there is a built in oil pressure relief valve that only dumps oil through the side drilling to the timing gears when the camshaft gallery has a minimum of 30 psi or 2 bar pressure.
The diameter of the side drilling can be increased, but at the moment, there appears to be sufficient lubrication to the timing gears.
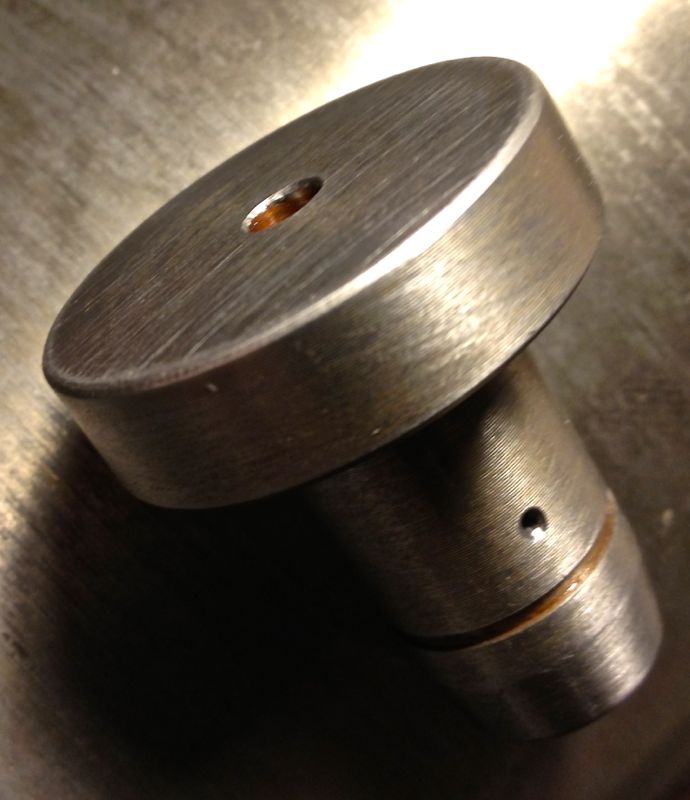
The circlip is not fitted in the following pic, and I haven’t rounded the corners at the tip. The evidence so far is it isn’t needed, but you can do this if you want.
The diameter of the side drilling can be increased, but at the moment, there appears to be sufficient lubrication to the timing gears.
The circlip is not fitted in the following pic, and I haven’t rounded the corners at the tip. The evidence so far is it isn’t needed, but you can do this if you want.
Comments
Panhard front pulley kit
Sunday 08 July 2012
I sent a few links off to a few people and from their feedback and just to avoid any confusion, the new front pulley kit will only work with a revised seal arrangement. To update the seal you need to fit these components, which will be available assembled or as separate parts for future maintenance if required.
However, as the space available is limited within the OEM timing gear cover, the front pulley kit and the seal kit are designed to be an easy fit upgrade option, which is much the same philosophy as the filter kit upgrades, and an added bonus for those that are not removing the engine or doing additional works in this area. Initially fitting this kit might seem daunting at first, but it is really designed to be as foolproof as possible.
Obviously when the parts are made, I will post a video outlining the installations and use in situ photographs covering the assembly procedure.
ASSEMBLY PROCEDURE
First remove the old pulley after removing the fan and saving all the springs and wooden blocks. Leaving the timing gear cover in place, install the inner part of the pulley, which will consist of an aluminium centre and a steel inner ring already assembled together, engaging the key in the slot.
Next place the lightly oiled seal assembly, which will come ready assembled, over the timing gear front pulley aperture, and slide the seal over the inner ring until the steel ring is against the timing gear cover. The stainless steel ring should just be inside the opening, and now needs pressing into place.

Using the crankshaft front pulley bolt, and a spacer, press the seal assembly into position, by tightening the crankshaft bolt until the stainless steel seal adaptor is fully seated against the timing gear cover. The interference fit should be enough of an oil tight arrangement, but there is an O ring seal detail to make sure it is.
Remove the front pulley crankshaft bolt & spacer, and then place remaining part of the front pulley kit, which will be a sliding fit, into the steel inner ring. Next fit all the springs, wooden blocks, and other fan related parts and rebuild the fan assembly, not forgetting the V belt. Then refit the crankshaft pulley bolt and tighten to OEM torque figures.
Note, there is a dowel pin detail that aligns the front pulley in a set position, which will be used for those owners that want to fit a trigger wheel, whose primary purpose is to facilitate the use of third party ignition or modern engine management systems to their vehicle.
However, as the space available is limited within the OEM timing gear cover, the front pulley kit and the seal kit are designed to be an easy fit upgrade option, which is much the same philosophy as the filter kit upgrades, and an added bonus for those that are not removing the engine or doing additional works in this area. Initially fitting this kit might seem daunting at first, but it is really designed to be as foolproof as possible.
Obviously when the parts are made, I will post a video outlining the installations and use in situ photographs covering the assembly procedure.
ASSEMBLY PROCEDURE
First remove the old pulley after removing the fan and saving all the springs and wooden blocks. Leaving the timing gear cover in place, install the inner part of the pulley, which will consist of an aluminium centre and a steel inner ring already assembled together, engaging the key in the slot.
Next place the lightly oiled seal assembly, which will come ready assembled, over the timing gear front pulley aperture, and slide the seal over the inner ring until the steel ring is against the timing gear cover. The stainless steel ring should just be inside the opening, and now needs pressing into place.
Using the crankshaft front pulley bolt, and a spacer, press the seal assembly into position, by tightening the crankshaft bolt until the stainless steel seal adaptor is fully seated against the timing gear cover. The interference fit should be enough of an oil tight arrangement, but there is an O ring seal detail to make sure it is.
Remove the front pulley crankshaft bolt & spacer, and then place remaining part of the front pulley kit, which will be a sliding fit, into the steel inner ring. Next fit all the springs, wooden blocks, and other fan related parts and rebuild the fan assembly, not forgetting the V belt. Then refit the crankshaft pulley bolt and tighten to OEM torque figures.
Note, there is a dowel pin detail that aligns the front pulley in a set position, which will be used for those owners that want to fit a trigger wheel, whose primary purpose is to facilitate the use of third party ignition or modern engine management systems to their vehicle.
Panhard crankshaft pulley with trigger wheel (updated)
Friday 06 July 2012
I have updated the CAD drawing to reflect my latest thoughts. I was looking for some oil pump parts and I came across a bag of Viton single lipped seals, which I recognised as some potential front pulley piston ring alternatives I bought five years ago. These seals were bought, as a continuation of the work I did with the rear bearing support seal adaptors, as I always intended to do away with the piston ring seals at either end of the crankshaft. I only made a few of these rear bearing adaptors, and I personally fitted a couple, and then sent some to the Netherlands, as well as a drawing to Germany.
There isn’t a seal that will fit directly into the timing gear cover, as it is a peculiar & unique diameter, so the idea back then was to make a carrier for the seal that would interface into the existing timing gear cover (same idea as the rear system I designed), which had the added bonus of not damaging the OEM timing cover too.This approach does mean a new front pulley assembly will be required, but this is in line with my philosophy of not damaging OEM stock when creating modified components. All the wearing surfaces are also easily replaced in years to come, and readily sourced, plus this system can recover worn timing covers.
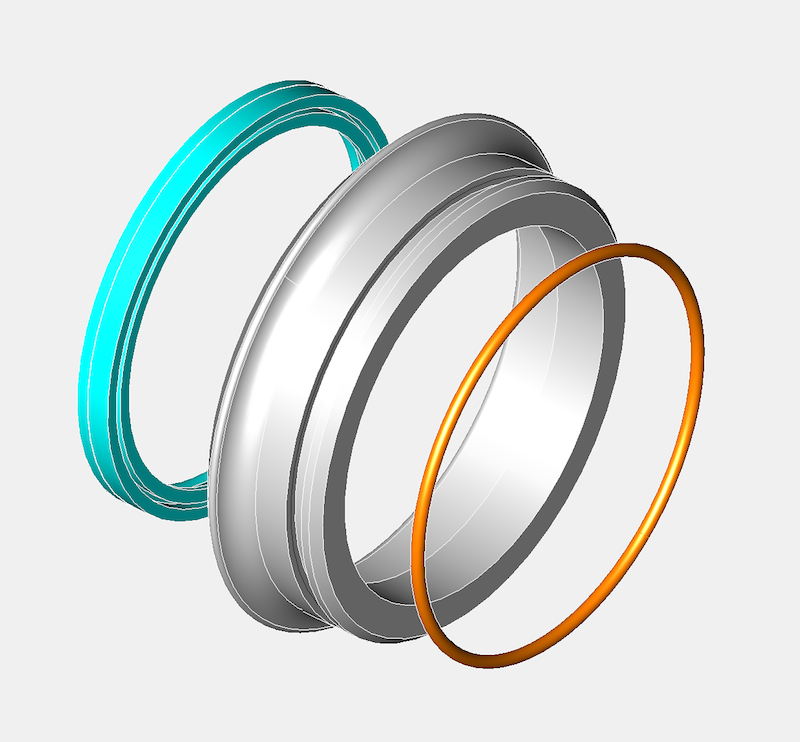
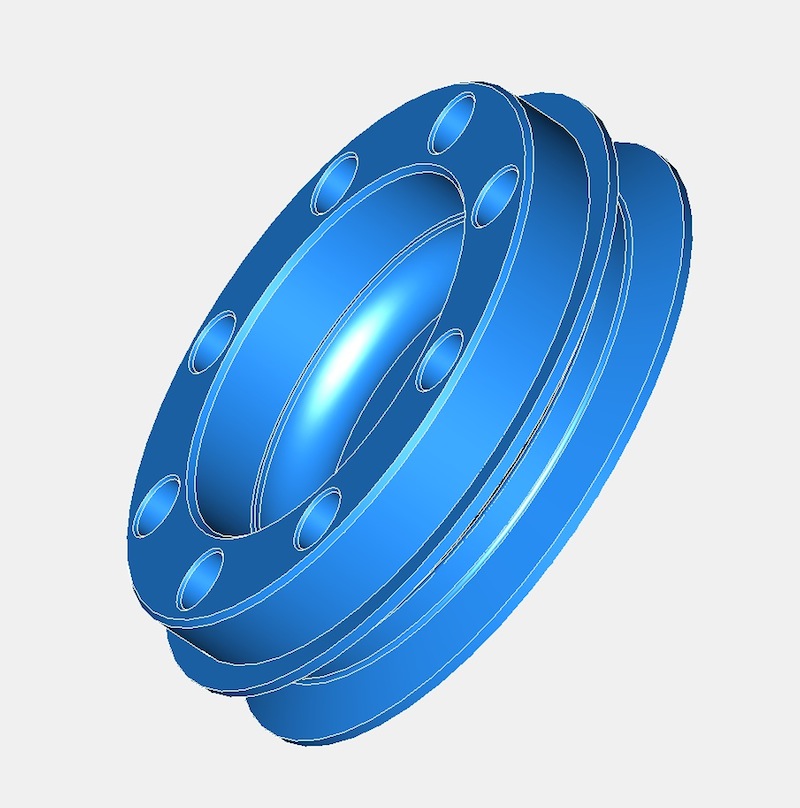
Today, I managed to get the timing gear cover seal diameter surfaces measured on a Elaton Coordinate Measuring Machine, so I now have a very precise idea of what diameter I need to make the new part so that it has a nice interference fit. This is the complete crankshaft conversion kit assembly pictured below.
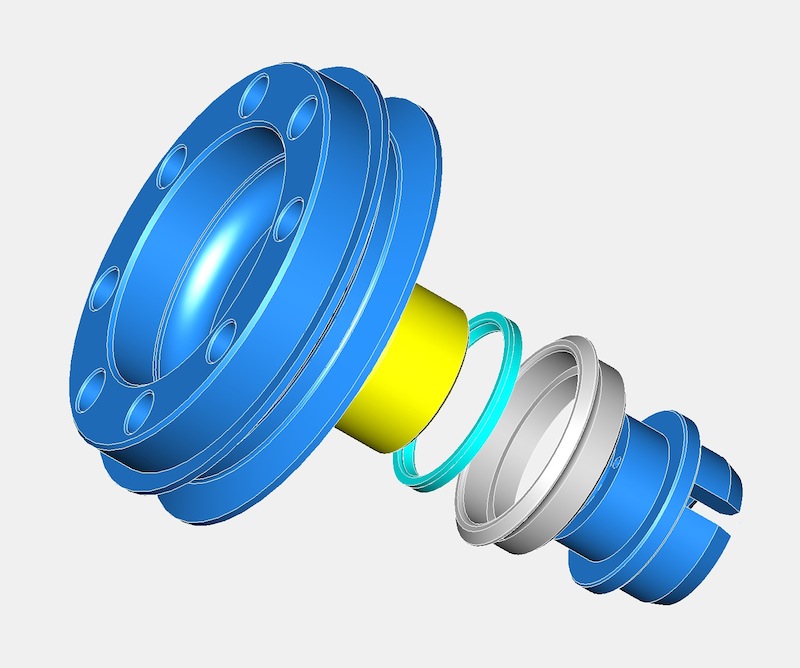
The grey part is the stainless steel seal carrier, and the cyan part the Viton seal. The yellow part is the steel inner ring, which is easily renewed if required, with the blue parts being the aluminium two piece front pulley components. These are located with a small dowel pin, however the parts are held together by the main front pulley crankshaft bolt.
It is necessary to make the parts this way to allow for DIY installations by Panhard owners, and it will be relatively straight forward to fit the conversion kit.
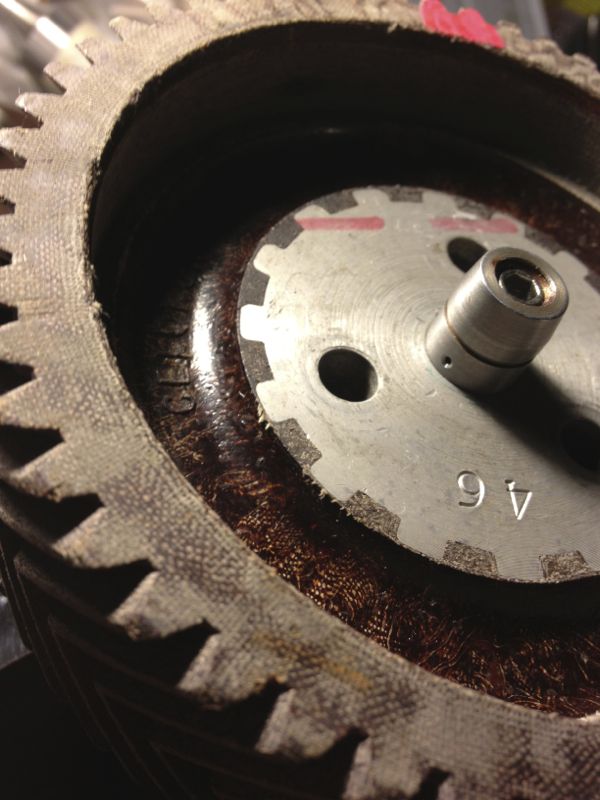
The picture below shows the optional trigger wheel version, which is needed by modern ignition or engine management systems, but fitting these is not for the faint hearted!
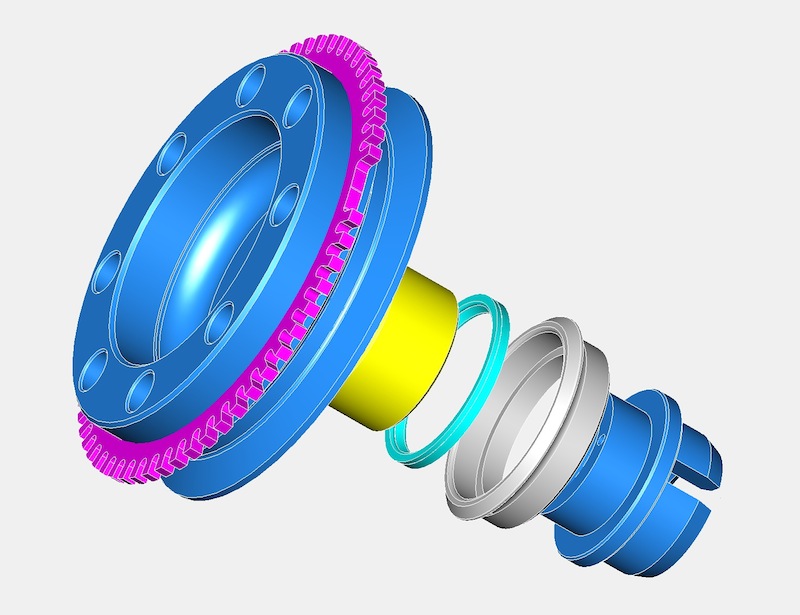

There are different tooth patterns available, but the one in the picture above is a 60-2 trigger wheel, commonly used by Bosch for VAG engines.
There isn’t a seal that will fit directly into the timing gear cover, as it is a peculiar & unique diameter, so the idea back then was to make a carrier for the seal that would interface into the existing timing gear cover (same idea as the rear system I designed), which had the added bonus of not damaging the OEM timing cover too.This approach does mean a new front pulley assembly will be required, but this is in line with my philosophy of not damaging OEM stock when creating modified components. All the wearing surfaces are also easily replaced in years to come, and readily sourced, plus this system can recover worn timing covers.
Today, I managed to get the timing gear cover seal diameter surfaces measured on a Elaton Coordinate Measuring Machine, so I now have a very precise idea of what diameter I need to make the new part so that it has a nice interference fit. This is the complete crankshaft conversion kit assembly pictured below.
The grey part is the stainless steel seal carrier, and the cyan part the Viton seal. The yellow part is the steel inner ring, which is easily renewed if required, with the blue parts being the aluminium two piece front pulley components. These are located with a small dowel pin, however the parts are held together by the main front pulley crankshaft bolt.
It is necessary to make the parts this way to allow for DIY installations by Panhard owners, and it will be relatively straight forward to fit the conversion kit.
The picture below shows the optional trigger wheel version, which is needed by modern ignition or engine management systems, but fitting these is not for the faint hearted!
There are different tooth patterns available, but the one in the picture above is a 60-2 trigger wheel, commonly used by Bosch for VAG engines.
Panhard crankshaft pulley with trigger wheel (CAD)
Sunday 26 February 2012
I have made several distributor based electronic ignition prototypes over the years, and although cost effective, they all have a lack of precision, because they run through the existing drive mechanisms, which are a slotted drive on the end of a geared oil pump, which is powered by another gear on the gear driven camshaft.
Ultimately I need to fit a crankshaft timing trigger to this engine, as part of the ongoing ignition & fuelling developments, and the traditional locations for these are the flywheel or front pulley. If I want to gear this up for retrospective and easy fitment, the flywheel really is out of the question, because this is an engine out exercise in a Panhard, and that is a no brainer.
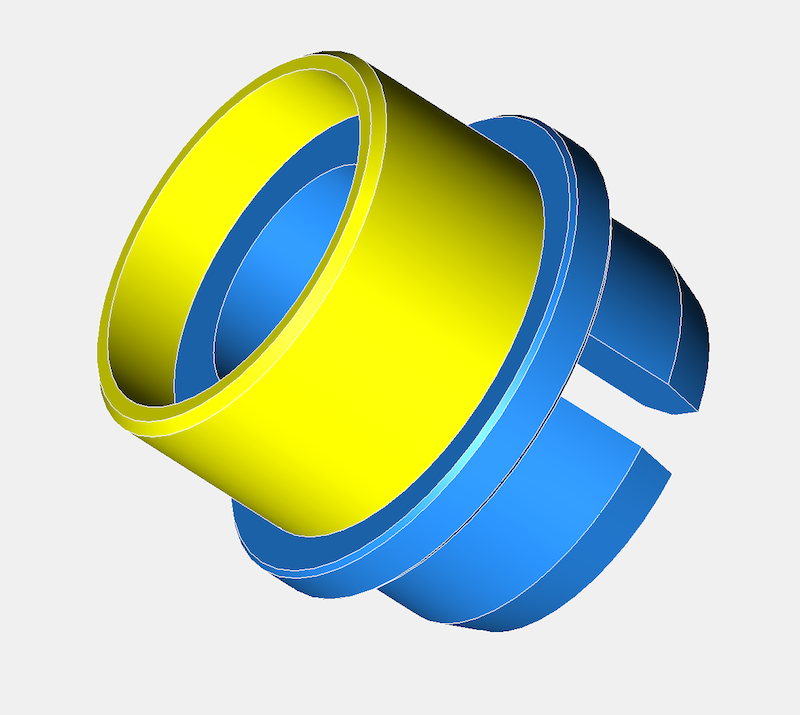
That now means the front pulley arrangement has the most potential, and that is what the majority of modern car manufacturers use anyway. Although it is possible to add a trigger wheel to the existing pulley, like I have done in my bench testing to date, there is a slight variance in sizes that negates this. It’s my philosophy to always make new parts wherever possible, so that old ones don’t get destroyed unnecessarily. At the same time there might be other design changes or benefits you can bring to this area, so for example I can incorporate a modern oil seal, assuming you tweak the timing gear casing, and also make the pulley rebuildable. If this is not to your liking, and you want to keep the OEM piston ring seal the design can be modified to accommodate this too, by replacing the yellow part for another.
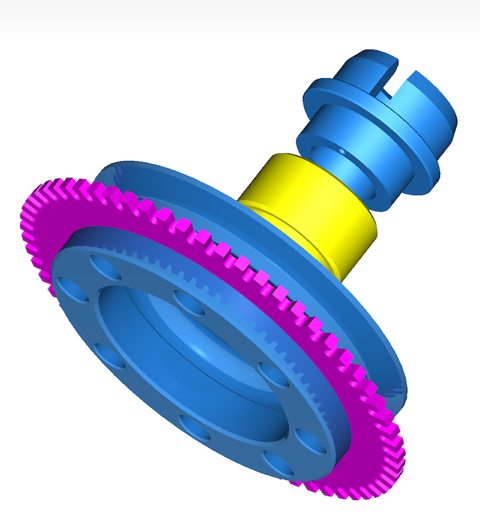
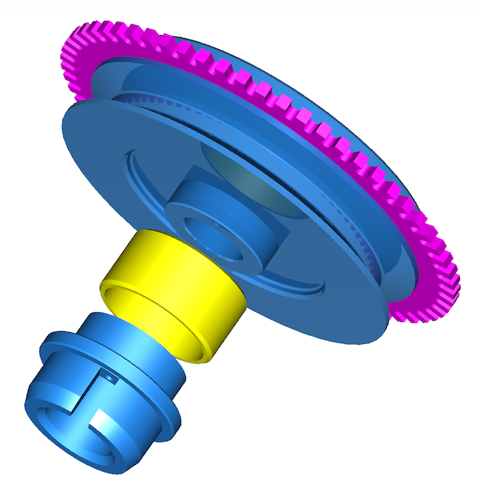
Latest CAD thoughts are pictured below, and the pulley now has a renewable inner ring shown in yellow, which acts as a running surface for the double lipped oil seal. The aluminium parts in blue now have a location dowel for timing purposes. The trigger wheel shown in purple is also a standard 60-2 pattern, which gives improved triggering over the lesser toothed versions I was experimenting with.
Next up, look at the VR sensor support bracket, chase up the pistons, and hopefully acquire a boring machine.
Ultimately I need to fit a crankshaft timing trigger to this engine, as part of the ongoing ignition & fuelling developments, and the traditional locations for these are the flywheel or front pulley. If I want to gear this up for retrospective and easy fitment, the flywheel really is out of the question, because this is an engine out exercise in a Panhard, and that is a no brainer.
That now means the front pulley arrangement has the most potential, and that is what the majority of modern car manufacturers use anyway. Although it is possible to add a trigger wheel to the existing pulley, like I have done in my bench testing to date, there is a slight variance in sizes that negates this. It’s my philosophy to always make new parts wherever possible, so that old ones don’t get destroyed unnecessarily. At the same time there might be other design changes or benefits you can bring to this area, so for example I can incorporate a modern oil seal, assuming you tweak the timing gear casing, and also make the pulley rebuildable. If this is not to your liking, and you want to keep the OEM piston ring seal the design can be modified to accommodate this too, by replacing the yellow part for another.
Latest CAD thoughts are pictured below, and the pulley now has a renewable inner ring shown in yellow, which acts as a running surface for the double lipped oil seal. The aluminium parts in blue now have a location dowel for timing purposes. The trigger wheel shown in purple is also a standard 60-2 pattern, which gives improved triggering over the lesser toothed versions I was experimenting with.
Next up, look at the VR sensor support bracket, chase up the pistons, and hopefully acquire a boring machine.
